The performance of our WordPress depends on a large number
of resources that, individually, provide different functions in order to
improve the optimization of our site under construction. With Yoast SEO search
engine optimization is no longer a complex issue, being a plugin designed to
provide everything you need in terms of SEO optimization through a single tool.
Today we will talk about the Yoast SEO configuration and how to do it
correctly.
By configuring Yoast SEO you will access a series of
functions that, simultaneously, will allow you to optimize various elements of
your WordPress. Hence, this Plugin has become one of the most iconic for the
construction of many websites configured from On-Page SEO.
Table of Contents
- Set up Yoast SEO step by step
- Custom menu
- General
3.2. Features
3.3. Webmaster Tools
4. Seeker Appearance
4.1. General
4.2. Content Types
4.3. Media
4.4. Taxonomies
4.5. Files
4.6. Breadcrumbs
4.7. RSS feed
5. Search Console
6. Social
6.1. Accounts
6.2. Facebook
6.3. Twitter
7. Tools
7.1. Import and export
7.2. File Editor
7.3. Mass editor
Set up Yoast SEO step by step
Alternatively to the Yoast SEO wizard settings, you can
configure your site optimization in a personalized way. This makes it possible
for you to improve many aspects present in the download and positioning process
of your website.
If you want to apply an effective configuration to improve
search engine positioning from Yoast SEO, consider the steps that I present
below. We start
Custom menu
Yoast SEO has its own menu. You will notice this when
activating it once you install it. You will notice that in the sidebar, on the
left side of your WordPress, you will find a new menu called “SEO” and below
it, a list of options ordered as follows:
- General
- Seeker Appearance
- Search Console
- Social
- Tools
- Premium
Next, we will examine in detail the modification of each of
these sections in order to arrive at the best Yoast SEO configuration step by
step and in just a few minutes.
General
In this section you will have at your disposal three tabs:
Desktop, Features and Webmaster tools. Locate them and click on each of them
you can expand to the options offered. We will go in the order shown in the
Yoast menu.
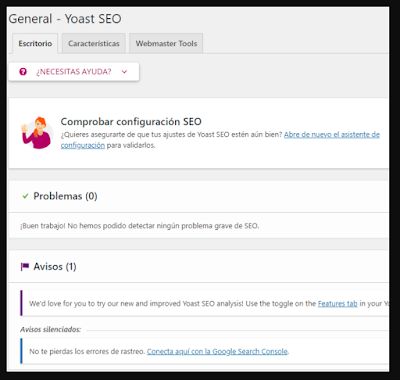
Desk
You will notice that in this tab you will be notified about
the existence of any problem or problem present in your WordPress. This will be
the main panel of the status of your site. If there are any failures, the
values enclosed in parentheses present on the right side of Problems and
Warnings will change immediately.
In the background you will find an ad that offers you the
possibility of becoming a Premium user. Finally, on the right side, you will
see a series of offers ready to improve some of your knowledge in SEO tools.
 |
Features
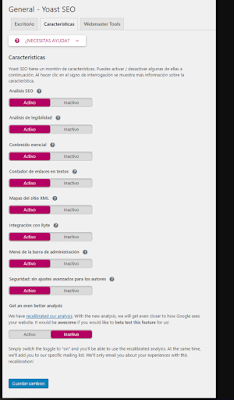
Clicking on this second tab you will find a list of options
activated by default. You must maintain this configuration for each of these.
Why? Let's go in order:
SEO Analysis: While activated, you authorize Yoast SEO to
make suggestions regarding the improvement of your SEO entry and page. It will
also ensure that the keywords are present in the text, that the URL is correct
and that you have snippet defined.
Readability analysis: It tells you how easy your text is to
read and from there, make suggestions to improve its readability.
Essential content: With this option you will establish the
content that, in a leading way, must be present on your website as an essential
element.
External links counter: This option ensures that you use
external links for your entries. This is an important indicator for the
transparency and credibility of each entry.
XML site maps: With the activation of this resource, Yoast
SEO will present a list of essential pages for your site. This will facilitate
the process of indexing and positioning for Google regarding your website.
Likewise, Integration with Ryte, Administration bar menu and
Security are elements that, if kept activated, will provide better performance
and optimization for your WordPress site.
Already in the last tab we will be in front of a list
of fields to fill. These fields are designed to enter the verification.
These verification codes are used to create a meta tag that
search engines can use to establish that you really own a website and thus give
you relevant information related to how they are looking for you and the status
of your website.
Seeker Appearance
We are now in the second section, Seeker Appearance. In
total, it contains seven tabs to configure: General, Content types, Media,
Taxonomies, Files, Breadcrumbs and RSS.
The idea in this section is to indicate how you want Google
to project the information you have about the content of your website.
General
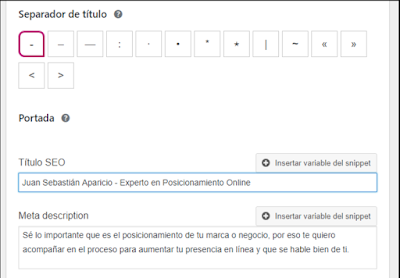
Here you will define how browsers will present your site in
search results. In the field "SEO Title" You must enter the title of
the main page of the site. This title is the one that will be displayed in the
search engine.
You must also include the separator and a brief description,
and it will be you who defines the most appropriate order from your content.
You will also elaborate the meta description for your site.
In the "Knowledge Graph" section you must
configure if you are a person or a company, If you are a person, just enter
your name, if you are a company, then add your logo and your name. This
information will also be converted into meta tags that Google can use to
display in the Knowledge graph.
Content Types
This configuration will work as a default template or
default values that each type of content that you have registered in
WordPress will have. But before that you can also configure:
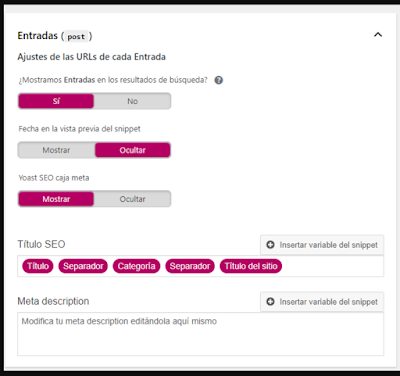
Do we show type of content in the search results ?: This
will indicate if you want Google to be able to access and display this type of
content in your search results. Some types of content are pages and posts
Date in the snippet preview: It is recommended to hide. The
reason is because publications with some seniority tend to attract less
attention.
Yoast SEO goal box: It is recommended to show. This will
allow the Yoast SEO target box to be displayed in the content editor for this
type of content, which will allow you to customize the title, description and
audit it.
In the fields "SEO Title" and "Meta
description" you can enter variables that will be replaced by Yoast SEO to
show information of each content for example: if you enter the variables
"Title, separator, category, separator, site title" the plugin will
replaced by the information of the content as "SEO trends to wait in this
2019 - Blog - Juan Sebastián Aparicio".
The full list of variables that you can use in this section
can be found by clicking on the “Need help?” Button and clicking on the
“Snippet variables” tab.
Media
In the "Media" tab you will define if the URL of
an image or media that is appreciated in any of your entries is redirected to
the website that contains it. To do this, you must activate the Yes option on
the only box that you will appreciate on this tab.
Taxonomies
After completing the previous step, go to the Taxonomies
tab. It is nothing more than any of the tags or classes that you have created
to use on your website. On this step there is controversy, and there are those
who say that it is not convenient to index the categories until they do not
have any content for it.
However, experts say indexing tags can also be a good
resource for ranking long-tailed content on Google. Therefore, I recommend that
you apply “Yes” in the “Show Category” option.
Then you can indicate SEO title and description as we did in
the previous section, integrating variables if necessary and select if you want
the Yoast SEO target box to be displayed or not. The labels section applies
equally.
Files
With regard to author archives, you should ensure that it is
only indexed when you build a blog with more authors. Based on this, you should
ensure that the information shown indicates which authors have had entries.
Simply put, if your blog has been built by more than one author, activate the
author archives option.
If instead you are the only person in charge of the content
of your blog, disable the option, otherwise Google would suspect your content,
processing it as duplicate content.
For the file settings by date option, it will be better than
deactivate it, so you will avoid, once again, being accused by Google for
duplicate content. For the last option, Special Pages, you don't have to
configure anything, because the default configuration is enough.
Breadcrumbs
Bread crumbs are known as those navigation paths that are
placed at the bottom of the main menu of many websites. Its function, indicate
to the browser its exact location on a website.
As you can imagine, this option would be ideal for truly extensive
websites. Cases such as corporate websites, as well as some that have many
sections that require this so that the user can be located. If this is not your
case, keep the standard configuration of the box (Disabled).
If on the contrary you require this resource, Yoast SEO will
request information so that you configure the display of breadcrumbs, taking
care of minimal details such as the shape of the text, the size and the
separation of the crumbs.
RSS feed
They allow to provide information to third parties who
browse the web. To avoid having your content stolen, Yoast SEO allows you to
add information before, after or both of each post so you can protect your
content. The labels available for this are:
AUTHORLINK : A link to the blog with the author's name
as a link.
POSTLINK : Link that has the title of the post as
anchor text.
BLOGLINK : Link to your site with the site name as an
anchor.
Search Console
This option contains functionalities that analyze, optimize
and verify the positioning of your website in the Google search engine
responses.
Yoast SEO allows you to access the same information that
Google offers but directly on your WordPress. To do this you must add your
website to Search Console from your Google account.
This is how after accessing “Settings” you will click on
“obtain the Google authorization code”. Then you will get the code that you
will enter in the empty field. Click "Authorize" and you can start
analyzing.
Social
You can now leave the "Search Console" section.
Now, to enter the final phase, proceed to place yourself in the
"Social" section. Pay attention to the steps I present below. You
will make use of social networks to increase traffic on your page as follows.
Yoast does not forget the importance of social networks in
positioning. This is how you will find a section ready to link your page to
your different social networks. You will find that this section has five tabs:
Accounts, Facebook, Twitter, Pinterest and Google+.
Let's go to the first of these:
Accounts
You will find a list of empty fields. Each corresponding to
a social network, adding a total of eight channels through which you can
promote your website.
To do this, copy and paste the URL of each of the accounts
you have in one of these social networks and then Save. Keep in mind that the
case of Twitter, in which you will insert your user, you must place your
nickname without the @ respectively.
Facebook
Here you will configure some minimum elements.
Fundamentally, Yoast has a series of tools that allow you, from different
social networks, to enrich the way in which your content on these networks will
be seen by the rest of the users. In that sense, we refer to meta tags or Open
graph, a form of information arranged in three basic elements:
- Title
- Image
- Description
In this tab you can edit how the start or homepage of your
site will look on social networks, choose an image, title and description. Then
choose a default image that will be displayed when an article has no featured
image or when the image is very small.
To customize the display of each content, go to the edition
of any of the entries and search below the entry, the "social" icon.
It is located in the area below the traffic light logo. You will find an
interface where you can edit both the title and the description and image
arranged for your meta tag.
You will notice that at the time of sharing your website in
the social networks that you have linked from Yoast, a meta tag will be
presented in an orderly manner based on the edition that you would have
previously made.
Twitter
In this tab you can choose the way in which the content is
displayed once you share it on Twitter, we recommend using the default option
“Summary with large image”.
As in the case of Facebook, you can use Twitter to increase
traffic on your website. To customize the information to be displayed on
Twitter, go to the "Twitter" tab. Next, locate the same interface you
used for the Facebook case, but be sure to select it from the Twitter icon.
You will see that, as in the previous case, you will find
three fields to fill out. The first, for a title, the second, for a
description, and the third, to insert an image. Remember to be careful with the
information you provide in your meta tags, as this will be the first thing your
users will see in any of the networks in which you promote your website.
Tools
As the last section, you will enter Tools. It is a set of
elements that Yoast SEO offers in order to provide the owner of the page with
more comfortable management. They are not fundamental to SEO. However, they can
be helpful on different occasions.
In the tools view you will find three main titles:
Import and export
File Editor
Mass editor
Import and export
By clicking on this first title you will access a window
with three tabs: “Import settings, Export configurations and, finally, Import
from other SEO plugins”.
These options will be of great help especially if you have
more than one website. And it is that as you can see in the three tabs, you can
import the configuration you use for your websites from one to another, making
the optimization of other websites a few minutes process.
All information related to your configuration will be stored
in Zip format, which you can import to other websites and activate from this
tab, by clicking on the option “import from other SEO plugins”.
File Editor
With this option you can modify, edit and even create files
for WordPress installation that can be a great help for SEO. These files will
depend on the characteristics of your page and content, so you should make
those that, according to your criteria, are the most convenient for your page.
Mass editor
With this tool you can make large-scale changes in all the
resources arranged to configure your WordPress. In the first of its tabs,
"Title", you can edit the snippet title of each of your site's
entries in no time. As well as the “description” tab, you can apply any editing
work for the snippet.
In addition, it has a link counter that lets you know the
number of external links found in each entry. So be sure to always include
links that contribute to the credibility of your site and Google can position.
We hope this post will be very helpful when setting up Yoast
SEO in WordPress. Do you think we missed something in the post? Tell us about
your experience in the comment box.


0 Comments